Welcome to the Grindstone 4 manual. It was last updated on September 18th, 2017.
- Basics
- Functionality
- For Grindstone 2, Grindstone 3, and Task Force Users
- Reference
Basics
Grindstone holds on to several different kinds of data. Those pieces of data relate to each other as shown in this chart:

Work Items
Grindstone is designed to track time spent working on specific jobs, tasks, goals, etc. Each of these is represented by a work item. Work items have names and notes, both of which are optional.
People
Grindstone also keeps a record of who is logging time, which it represents as a person (plural: people). People have names, which are optional except when using Grindstone Sync.
Properties
Grindstone allows the creation of additional, user-defined fields for work items, called properties. There are two types of properties: free form and list. Free form properties allow any text, apart from line breaks and carriage returns. List properties require that a list of valid values for the property are maintained by the user in the form of list values. This is useful for avoiding human error when dealing with a property the domain of which truly is limited to a finite list (e.g. clients, projects, priority levels, etc.).
Time Slices
Each period of time logged against a work item is called a time slice. Each time slice is associated with one work item and one person. Time slices have a start time, and end time, and notes fields. The notes field is optional, the others are not.
Assignments
Grindstone stores each unique person's due date, estimate, or complete date per work item using assignments. Each assignment is associated with one work item and one person, and there can only be one assignment per each unique combination of work item and person. Each field of an assignment is optional. Assignments are also used to manage permissions in certain configurations of Grindstone Sync.
Views
Views are Grindstone's most basic way of displaying information and allowing users to interact with data. There is a type of view for each type of data as shown by the chart above (see Basics), with the exception of free form values.
Views provide access to functionality specific to the type of data being viewed. For those details, see:
For functionality common to all views, see Views.
Functionality
Main Window
The main window of Grindstone looks like this:
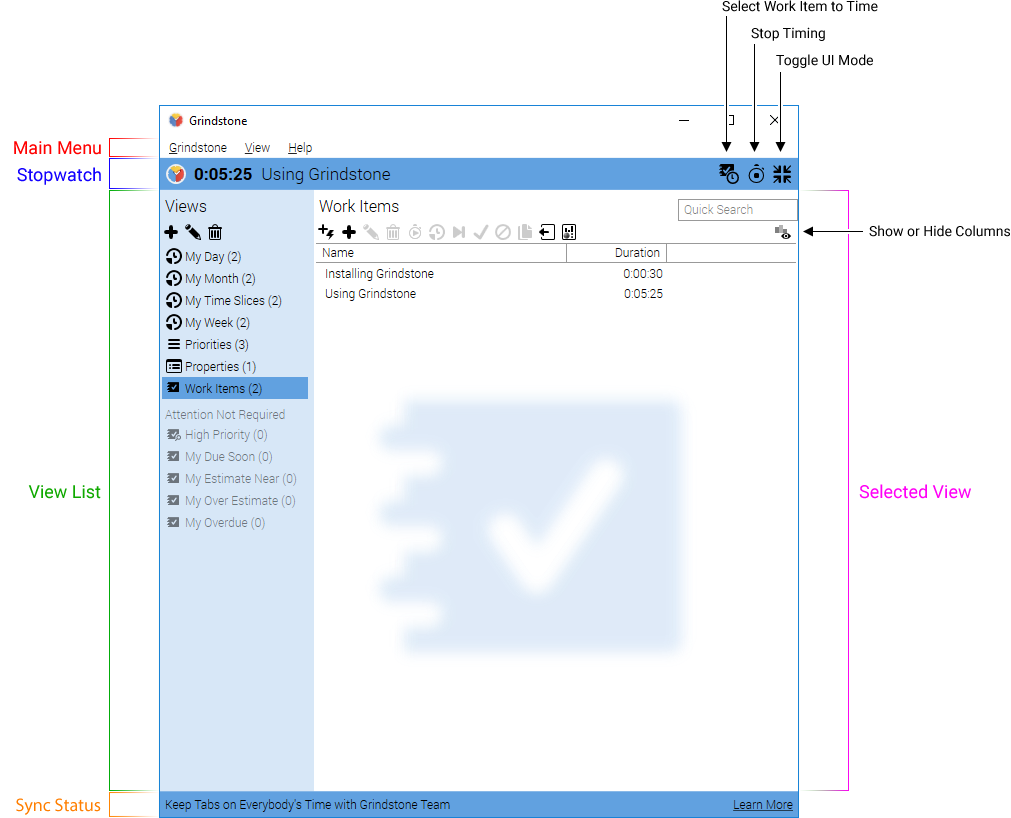
It has five main areas:
- Main Menu
- Grants access to primary functions such as creating and opening databases, configuring options, and quitting Grindstone
- Stopwatch
- Displays information about and controls for governing time tracking; only area shown when in Stopwatch mode
- View List
- Displays the available views and controls for managing views
- Selected View
- Displays the currently selected view in the View List, and its accompanying controls
- Sync Status
- Shows the status of the connection to Grindstone Sync
Project Management
In order to track time, Grindstone needs to know a thing or two about what is being worked on. That's where the project management features come in to play. This section is all about the tools that are available to define that work and categorize it.
Work Items
Managing Work Items
If a Work Items view does not exist, create one by following these steps:
- Click the View menu
- Select New Work Items View
- Click the OK button
To start creating a new work item:
- Click the Grindstone menu on the top of the main window
- Select New
- Select Work Item
Alternatively, to start creating a new work item from a work item view, do any of the following:
- Click the Create New button (the icon is a plus sign)
- Right-click inside the work item view and select Create New
- Click inside the work item view and press the insert key
To start modifying work items:
- Click a work item view in the view list
- Select the work items to modify in the selected view
- Do any of the following:
- Click the Modify button (the icon is a pencil) on the top of the list of work items
- Right-click one of the selected work items and select Modify
- Double-click a single work item to modify
- Press the enter key
To modify the work item currently being timed:
- Click the Grindstone logo just to the left of the work item's name in the Stopwatch on the top of the main window
- Select Modify Timed Work Item
To delete work items:
- Click a work item view in the view list
- Select the work items to delete in the selected view
- Do any of the following:
- Click the Delete button (the icon is a trash can) on the top of the list of work items
- Right-click one of the selected work items and select Delete
- Press the delete key
Important Deleting work items will also delete all assignments and time slices associated to them.
Work Item Editor
The window that is shown when creating or modifying work items is the Work Item Editor. It has the following fields:
- Name
- The name of the work item
- My Estimate
- The estimate for the assignment associated with the work item and the current person
- My Due Date
- The due date for the assignment associated with the work item and the current person
- My Complete Date
- The complete date for the assignment associated with the work item and the current person
- Notes
- The notes for the work item
- Property
- The value for a property for the work item
When modifying more than one work item, Grindstone will at first show only the values all work items being modified have in common. If the work items have different values for a particular field, a Multiple Values - Click to Set button will appear over the value of the field. Click that button to instruct Grindstone to set the value of that field for each work item being modified to a value.
When using Grindstone Sync and creating a new work item, an additional Create Assignments for People section will be displayed. This allows the user to select one or many people for which to create assignments to the new work item.
Click the OK button or press the enter key to create or modify the work item(s). Click the Cancel button or press the escape key to cancel creating or modifying the work item(s).
Note The enter key short-cut will not work when the Notes field has focus, so that line breaks may be entered. To confirm creating or modifying the work item using only the keyboard from within this field, hold down the control key and press the enter key.
Assignments
Managing Assignments
If an Assignments view does not exist, create one by following these steps:
- Click the View menu
- Select New Assignments View
- Click the OK button
To start creating new assignments:
- Click the Grindstone menu on the top of the main window
- Select New
- Select Assignment
Alternatively, to start creating new assignments from an assignment view, do any of the following:
- Click the Create New button (the icon is a plus sign)
- Right-click inside the assignment view and select Create New
- Click inside the assignment view and press the insert key
To start modifying assignments:
- Click an assignment view in the view list
- Select the assignments to modify in the selected view
- Do any of the following:
- Click the Modify button (the icon is a pencil) on the top of the list of assignments
- Right-click on one of the selected assignments and select Modify
- Double-click a single assignment to modify
- Press the enter key
To delete assignments:
- Click an assignment view in the view list
- Select the assignments to delete in the selected view
- Do any of the following:
- Click the Delete button (the icon is a trash can) on the top of the list of assignments
- Right-click one of the selected assignments and select Delete
- Press the delete key
Assignment Editor
This window that is shown when creating or modifying assignments is the Assignment Editor. It has the following fields:
- Estimate
- The amount of time it is predicted the assignment will take
- Due Date
- The date the assignment is due
- Complete Date
- The date the assignment was completed
A field will start as a button labeled Click to Set when any of the following conditions are true:
- Creating new assignments
- Modifying one or multiple assignments without a current value set for that field
- Modifying multiple assignments with different values set for that field
Otherwise, a field will start with a value already displayed when all of the following conditions are true:
- Modifying one or more assignments
- Each assignment has the same value set for the field
Values left blank will be cleared for the assignments being created or modified. To do this deliberately, delete the text for Due Date or Complete Date using the backspace or delete key, or set an Estimate equal to 0:00:00.
When creating new assignments, a list of people and a list of work items will also be displayed. Use the control and shift keys to select more than one entry in each list. Grindstone will create a new assignment for each unique combination of person and work item, or modify an existing assignment if one already exists per a given unique combination. For example, when three work items and two people are selected, up to six new assignments may be created.
Click the OK button or press the enter key to create or modify the assignment(s). Click the Cancel button or press the escape key to cancel creating or modifying the assignment(s).
Completing Assignments
Grindstone has three quick functions for setting the complete date of an assignment:
- Set Complete at End
- Sets the complete date to the end of the latest time slice entered for the same person and work item
- Set Complete at Now
- Sets the complete date to the current date and time
- Set Incomplete
- Unsets the complete date
These functions are available from assignment and work item views. When used from a work item view, they apply specifically to the current person's assignment per the work item operated upon.
To use Set Complete at End:
- Click an assignment or work item view in the view list
- Select the assignments or work items set complete as of the ends of their latest associated time slices
- Do any of the following:
- Click the Set Complete at End (or Set My Complete at End) button (the icon is a next track/chapter symbol) on the top of the list of assignments or work items
- Right-click one of the selected assignments or work items and select Set Complete at End (or Set My Complete at End)
To use Set Complete at Now:
- Click an assignment or work item view in the view list
- Select the assignments or work items set complete as of now
- Do any of the following:
- Click the Set Complete at Now (or Set My Complete at Now) button (the icon is a checkmark) on the top of the list of assignments or work items
- Right-click one of the selected assignments or work items and select Set Complete at Now (or Set My Complete at Now)
To use Set Incomplete:
- Click an assignment or work item view in the view list
- Select the assignments or work items set incomplete
- Do any of the following:
- Click the Set Incomplete (or Set Incomplete for Me) button (the icon is a no symbol) on the top of the list of assignments or work items
- Right-click one of the selected assignments or work items and select Set Incomplete (or Set Incomplete for Me)
Properties
Managing Properties
If a Properties view does not exist, create one by following these steps:
- Click the View menu
- Select New Properties View
- Click the OK button
To start creating a new property:
- Click the Grindstone menu on the top of the main window
- Select New
- Select Property
Alternatively, to start creating a new property from a property view, do any of the following:
- Click the Create New button (the icon is a plus sign)
- Right-click inside the property view and select Create New
- Click inside the property view and press the insert key
To start modifying a property:
- Click the Properties view in the view list
- Select the property to modify in the selected view
- Do any of the following:
- Click the Modify button (the icon is a pencil) on the top of the list of properties
- Right-click the selected property and select Modify
- Double-click the property to modify
- Press the enter key
To delete properties:
- Click the Properties view in the view list
- Select the properties to delete in the selected view
- Do any of the following:
- Click the Delete button (the icon is a trash can) on the top of the list of properties
- Right-click one of the selected properties and select Delete
- Press the delete key
Property Editor
The window that is shown when creating or modifying properties is the Property Editor. It has the following fields:
- Name
- The name of the property
- Notes
- The notes for the property
The type of property (list or free form) can only be chosen as the property is being created. To enter a list of possible values and constrain the property to only being blank or one of those values, tick the Specify a List of Possible Values for This Property box.
Click the OK button or press the enter key to create or modify the property. Click the Cancel button or press the escape key to cancel creating or modifying the property.
Note The enter key short-cut will not work when the Notes field has focus, so that line breaks may be entered. To confirm creating or modifying the property using only the keyboard from within this field, hold down the control key and press the enter key.
Managing List Values
When creating a list property, Grindstone will automatically generate a list value view filtered just to show list values for that property and switch to it. The assumption is that the next step is to enter list values for the new list property. To manage the list values of a property that has already been created, select the list values view for the property in the view list. If such a view does not already exist, follow these steps:
- Click the Properties view in the view list
- Right-click the list property for which to manage list values
- Select Quick View
- Select List Values
To start creating a new list value:
- Click the Grindstone menu on the top of the main window
- Select New
- Select List Value
Alternatively, to start creating a new list value from a list value view, do any of the following:
- Click the Create New button (the icon is a plus sign)
- Right-click inside the list value view and select Create New
- Click inside the list value view and press the insert key
To start modifying a list value:
- Click a list value view in the view list
- Select the list value to modify in the selected view
- Do any of the following:
- Click the Modify button (the icon is a pencil) on the top of the list of list values
- Right-click the selected list value and select Modify
- Double-click the list value to modify
- Press the enter key
To delete list values:
- Click a list value view in the view list
- Select the list values to delete in the selected view
- Do any of the following:
- Click the Delete button (the icon is a trash can) on the top of the list of list values
- Right-click one of the selected list values and select Delete
- Press the delete key
To enter new list values from a list value view quickly, click the Quick Entry button (the icon is a plus sign with a lightning bolt), type the name of a desired list value for the new list property, and then press the enter key. Repeat as necessary to populate the list.
List Value Editor
The window that is shown when creating or modifying list values is the List Value Editor. It has the following fields:
- Property
- The property for which the list value exists
- Name
- The name of the list value
The property can only be chosen as the list value is being created.
Click the OK button or press the enter key to create or modify the list value. Click the Cancel button or press the escape key to cancel creating or modifying the list value.
Toggle Listing
Although whether a property is list or freeform cannot be changed after it is created, Grindstone does provide the Toggle Listing function, which will do the following:
- Create a new property of the opposite type with the same name
- Set the value for the new property to an equivalent value per each work item
- Delete the current property
To access this function:
- Click the Properties view in the view list
- Select the property to toggle from free-form to list or from list to free-form in the selected view
- Do any of the following:
- Click the Toggle Listing button (the icon is three horizontal lines) on the top of the list of properties
- Right-click the selected property and select Toggle Listing
Important Using the Toggle Listing function causes Grindstone to create a new property and delete an old property that are semantically similar. Views will adjust by eliminating any sub filters that referred to the old property and ignore the creation of the new property. This circumstance can cause the actual behavior of a view to cease conforming to the meaning of the view as understood by users.
Time Tracking
The whole point of Grindstone's time tracking is to offload to an app all the labor of keeping meticulous notes on when work starts and stops, without sacrificing accuracy or precision. A user needs only to quickly update Grindstone on their work status when it changes, and Grindstone manages the log by creating time slices as appropriate.
Grindstone features the Stopwatch, which is responsible for giving users a summary of exactly what Grindstone thinks is going on, and quick ways to make changes. To make interactions with the Stopwatch as unobtrusive as possible, Grindstone also features Stopwatch mode. In this mode, the entire Grindstone interface is tucked away except for the Stopwatch, and the Stopwatch floats above other apps so users can always see it and potentially interact with it. Users can work and track their time accurately without ever having to use the full Grindstone interface.
Stopwatch
The Stopwatch appears just below the main menu on the Main Window. It consists of the following interface elements (from left to right):
- Grindstone Logo
- Animates while Grindstone is timing and displays the Stopwatch drop-down menu when clicked
- Timing Display
- Displays the time duration indicating progress while timing, as indicated by the user's preference in the Stopwatch drop-down menu's Timing Display Mode
- Timed Work Item
- Displays the name of the work item currently being timed and allows the user to type the name of a work item to switch timing to
- Select Work Item
- Displays the current list of work items when clicked, allowing the user to select a work item to switch timing to with the mouse
- Stop Timing
- Stops timing when clicked
- Toggle Interface
- Toggles between the full interface and Stopwatch mode
In addition to a few Stopwatch-specific user preferences, the Stopwatch drop-down menu features a collection of handy time tracking accoutrements:
- Modify Timed Slice
- Starts modifying the current time slice; particularly useful for adding notes to a time slice
- Move Timed Slice
- Another way to move the current time slice to a different work item (in addition to right-clicking on the Select Work Item button)
- Split Timed Slice
- Opens the current time slice in the timeframe editor; particular useful for correcting recent minor time tracking mistakes (e.g. when one should have started timing a different work item several minutes ago)
- Modify Timed Work Item
- Starts modifying the current work item; particularly useful for accessing the notes for the work item and the user's complete date, due date, and estimate
There are several preferences governing the behavior of the Stopwatch and Stopwatch mode. For more information, please see Options.
Away Detection
Grindstone tries to sense when the user has left the computer by a number of different means:
- The device input has been idle for an amount of time (by default, five minutes)
- The computer switched to another user account
- A Windows Remote Desktop session disconnected
- The computer was locked
- The computer went to sleep
If a work item is being timed when Grindstone senses the user has left, it will stop timing. When the user returns, Grindstone will ask the user what happened for the interim during which they were gone. Once the user answers Grindstone, it will make the appropriate adjustments to their timing data.
There are several preferences governing the behavior of away detection. For more information, please see Options.
Time Slices
Managing Time Slices
If a Time Slices view does not exist, create one by following these steps:
- Click the View menu
- Select New Time Slices View
- Click the OK button
To start creating a new time slice from scratch (without timing):
- Click the Grindstone menu on the top of the main window
- Select New
- Select Time Slice
Alternatively, to start creating a new time slice from scratch from a time slice view, do any of the following:
- Click the Create New button (the icon is a plus sign)
- Right-click inside the time slice view and select Create New
- Click inside the time slice view and press the insert key
To start modifying a time slice:
- Click an time slice view in the view list
- Select the time slice to modify in the selected view
- Do any of the following:
- Click the Modify button (the icon is a pencil) on the top of the list of time slices
- Right-click on the selected time slice and select Modify
- Double-click a single time slice to modify
- Press the enter key
To delete time slices:
- Click a time slice view in the view list
- Select the time slice to delete in the selected view
- Do any of the following:
- Click the Delete button (the icon is a trash can) on the top of the list of time slices
- Right-click the selected time slice and select Delete
- Press the delete key
Time Slice Editor
The window that is shown when creating or modifying time slices is the Time Slice Editor. It has the following fields:
- Person
- The person for whom the time is logged
- Work Item
- The work item for which the time is logged
- Start
- The starting date and time for the time slice
- Duration
- The amount of time between the time slice's start and end
- End
- The ending date and time for the time slice
- Notes
- The notes for the time slice
When modifying a time slice, the person field will be disabled, since time cannot be reassigned between people.
Click the OK button or press the enter key to create or modify the assignment(s). Click the Cancel button or press the escape key to cancel creating or modifying the assignment(s).
Note The enter key short-cut will not work when the Notes field has focus, so that line breaks may be entered. To confirm creating or modifying the property using only the keyboard from within this field, hold down the control key and press the enter key.
Timeframe Editor
The window that is shown when modifying a timeframe is the Timeframe Editor. Modifying timeframes occurs when the user splits a time slice, edits a gap in the gap detector, or responds to the return from away notification by telling Grindstone that their time away has complications.
The left side of this window displays controls for adding new time slices to the timeframe. To add a new time slice to the timeframe:
- Select a work item
- Select a range of time with the sliders on the bottom
- Click the Add Time Slice button
Or:
- Select a range of time with the slices on the bottom
- Double-click a work item
The right side of the window displays the timeframe as it will be logged, with each time slice represented by:
- Its work item's name
- Delete button (the icon is a trash can)
- Range slider for the time slice's start and end in relation to the timeframe
- Date and time pickers for precision selection of start and end times
- Duration of the time slice
Use the controls for each time slice to make adjustments as necessary. Grindstone will automatically clip and remove time slices to prevent overlap as adjustments are made.
Click the OK button or press the enter key to log the time as represented by the time slices on the right side of the window. Click the Cancel button or press the escape key to discard any changes to the timeframe.
Moving Time Slices
If time was ever accidentally logged to the wrong work item or needs to be moved for reorganization purposes, follow these steps:
- Click a time slice view in the view list
- Select the time slices to move
- Do any of the following:
- Click the Move… button (the icon is a clock with an arrow in the corner) on the top of the list of time slices
- Right-click one of the selected time slices and select Move…
- Select the desired work item
- Click the OK button (or just double click the work item)
If the currently timed slice needs to be moved, one can also:
- Right-click the Select Work Item button in the Stopwatch and select the desired work item
- Click the Grindstone logo in the Stopwatch, select Move Timed Slice, and then complete steps 4 and 5 above.
Splitting Time Slices
If time was ever logged omitting details or otherwise without the desired precision, follow these steps:
- Click a time slice view in the view list
- Select the time slices to split
- Do any of the following:
- Click the Split… button (the icon is a clock with an arrow in the corner) on the top of the list of time slices
- Right-click one of the selected time slices and select Split…
- Use the Timeframe Editor as desired to split the time slice
If the currently timed slice needs to be split, one can also click the Grindstone logo in the Stopwatch, select Split Timed Slice, and then complete steps 4 and 5 above.
Finding and Filling Gaps in Time
If time was not logged for a given period and recovery of that time is necessary, follow these steps:
- Click the Grindstone menu
- Select Gap Detector
- Use the controls on the top of this window to choose what periods of time could contain the sought gaps of time
- Recover the gaps
- One or more gaps should be directly assigned to a given work item as time slices:
- Select one or more gaps
- Click the Assign button (or just double-click the gap if there is only one)
- Select the desired work item
- Click the OK button (or just double-click the work item)
- A gap should be split and assigned to multiple work items:
- Select the gap
- Click the Edit button
- Use the Timeframe Editor as desired to specifying the time slices for the gap
- Click the OK button
- One or more gaps should be directly assigned to a given work item as time slices:
Click the Close button or close the Gap Detector window when satisfied.
Merging Time Slices
If one or more time slices for the same work item and person are logged back to back, it may be desirable to merge them together. To do so:
- Click a time slice view in the view list
- Select the time slices to merge
- Do any of the following:
- Click the Merge button (the icon is two arrows merging together) on the top of the list of time slices
- Right-click one of the selected time slices and select Merge
Important The Merge function will not rearrange time slices in any way. It will only merge them, and only if they are for the same work item and person, and are adjoining or overlapping. If there is even one second between two otherwise adjoining time slices, they will not be merged. Use the Gap Detector to resolve these gaps quickly and use Merge again.
Views
Views are Grindstone's most basic way of displaying information and allowing users to interact with data. There is a type of view for each type of data as shown by the chart in the Basics section (with the exception of free form values).
Views provide access to functionality specific to the type of data being viewed. For those details, see:
This section deals with functionality common to all types of views.
Managing Views
The views currently available are displayed on the left side of the main window. Each entry in this list consists of:
- An icon indicating the type of data the view is of
- The name of the view
- The number of entries currently displayed by the view in parenthesis
To start creating a new view, do one of the following:
- Click the View menu on the top of the main window
- Click the Create New View button at the top of the view list (the icon is a plus sign)
- Right-click the view list
Then, select the menu option that corresponds to the type of view desired.
To start modifying a view:
- Click a view in the view list
- Do any of the following:
- Click the Modify Active View button (the icon is a pencil) on the top of the view list
- Right-click one of the selected view and select Modify Selected View
- Double-click the view to modify
To delete a view:
- Click a view in the view list
- Do any of the following:
- Click the Delete Active View button (the icon is a trash can) on the top of the view list
- Right-click one of the selected work items and select Delete Selected View
View Editor
The window that is shown when creating or modifying views is the View Editor.
It allows the user to specify the name of the view using the Name field.
Views feature two ways to refine the list of entries they display out of all the entries possible: Quick Search (see Quick Search) and Filters (see Filters). Both of these features can be active at once.
If the Notify me when something is added to this view box is checked, Grindstone will do exactly that. This can occur because views continuously monitor all potential entries in order to add them to the view when they are changed to fall within the parameters of Quick Search and/or Filters, and vice-versa: to remove present entries when they are changed to cease falling within the parameters. This option exists because the view is unlikely to have the user's undivided attention when entries are added, which might be important to the user.
Click the OK button or press the enter key to create or modify the view(s). Click the Cancel button or press the escape key to cancel creating or modifying the view(s).
Managing Columns
Views feature many more columns than they show by default when they are created. They can be rearranged by clicking and dragging on their headers. They can sorted by clicking their headers. They can be toggled on or off with the menu shown when clicking on the Show or Hide Columns button (the icon is bars with an eye) above the list of entries, on the right.
Columns
In addition to the aspects of view entries listed below, properties are also available.
| Column | Description per View Entry Type |
|---|---|
| Assignments |
|
| Block Time (Quarter Hours) |
|
| Block Time (Tenth Hours) |
|
| Complete |
|
| Date |
|
| Day of Month |
|
| Day of Week |
|
| Day of Year |
|
| Due |
|
| Duration |
|
| End |
|
| Estimate |
|
| Estimate Ratio |
|
| Estimate Remaining |
|
| Hours |
|
| List |
|
| Month |
|
| Month of Year |
|
| Name |
|
| Notes |
|
| Overdue |
|
| Person |
|
| Property |
|
| Property Values |
|
| Start |
|
| Time Since Complete |
|
| Time Since End |
|
| Time Since Last Complete |
|
| Time Slices |
|
| Time Until Due |
|
| Time Until Next Due |
|
| Week |
|
| Week of Month |
|
| Week of Year |
|
| When Complete |
|
| When Due |
|
| When Last Complete |
|
| When Next Due |
|
| Work Item |
|
| Work Items |
|
| Year |
|
Quick Search
Quick Search applies a simple text search to all characteristics of a candidate entry, displaying it only if at least one characteristic contains the text entered by the user.
To apply a quick search to a view:
- Click a view in the view list
- Click the Quick Search text box on the right, above the list of entries
- Enter the phrase for which to search
To apply a quick search from the View Editor:
- Click a view in the view list
- Do any of the following:
- Click the Modify Active View button (the icon is a pencil) on the top of the view list
- Right-click one of the selected view and select Modify Selected View
- Double-click the view for which to apply a quick search
- Click the text box below Quick Search
- Enter the phrase for which to search
- Click the OK button
While a quick search is active, the Quick Search textbox will have a pulsing background and display an “X” button. Click the "X" button to cancel the quick search.
Filters
A filter applies a user-defined test to a single characteristic of a candidate entry. Entries are displayed only if all filters are satisfied (or if there are no filters). Filters may be managed from the View Editor.
Filters consist of:
- Characteristic
- An aspect of the candidate entry to be tested
- Test
- The kind of test to apply
- Value (or Values)
- The value (or values) to use as the standard of the test
- Negate
- When toggled on, the filter is satisfied when the test fails instead of when it succeeds
- Case Insensitive
- When toggled on with text characteristics, all tests ignore upper case vs. lower case
To manage filters:
- Click a view in the view list
- Do any of the following:
- Click the Modify Active View button (the icon is a pencil) on the top of the view list
- Right-click one of the selected view and select Modify Selected View
- Double-click the view for which to manage filters
To add a new filter, click the Add Filter button (the icon is a funnel). To toggle negation of a filter, click the Negate Filter button (the icon is the outline of a funnel). To toggle case-insensitivity for a filter, click the Case Insensitive Filter (this icon is a funnel with A's). To delete a filter, click the Delete Filter button (the icon is a funnel with an “X”).
The characteristic is the first drop-down box. The test is the second drop-down box. For most tests, the value is the third element in the filter's interface.
For filters testing with Is Element In, the list of elements appears below the characteristic and test. To add a new element, enter or select it using the area just below the list of values and then click the Add Element button (the icon is a funnel with three dots). To delete an element, select it in the list of elements and then click the Delete Selected Elements button (the icon is a funnel with three dots and an “X”).
For filters testing with Apply Subfilters, the list of subfilters appears, indented, below the characteristic and test of the parent filter. To add a new subfilter, click the Add Subfilter button (the icon is two funnels with a plus sign). Subfilters are just like filters, except using property values instead of built in characteristics. Thus, the first drop-down will be the list of properties available. When using the Property Values characteristic in the parent filter, all properties will be available. When using the Property Values (Select) characteristic in the parent filter, only list properties will be available.
Characteristics
| Characteristic | Description per View Entry Type |
|---|---|
| Assignment (Select) |
|
| Assignments |
|
| Block Time (Quarter Hours) |
|
| Block Time (Tenth Hours) |
|
| Calendar Days Since Complete |
|
| Calendar Days Since End |
|
| Calendar Days Until Due |
|
| Calendar Months Since Complete |
|
| Calendar Months Since End |
|
| Calendar Months Until Due |
|
| Calendar Weeks Since Complete |
|
| Calendar Weeks Since End |
|
| Calendar Weeks Until Due |
|
| Complete |
|
| Date |
|
| Day of Month |
|
| Day of Week |
|
| Day of Year |
|
| Due |
|
| Duration |
|
| End |
|
| Estimate |
|
| Estimate Ratio |
|
| Estimate Remaining |
|
| Hours |
|
| List |
|
| List Value (Select) |
|
| Month |
|
| Month of Year |
|
| Name |
|
| Notes |
|
| Overdue |
|
| Person |
|
| Person (Select) |
|
| Property |
|
| Property (Select) |
|
| Property Values |
|
| Property Values (Select) |
|
| Start |
|
| Time Since Complete |
|
| Time Since End |
|
| Time Since Last Complete |
|
| Time Slice (Select) |
|
| Time Slices |
|
| Time Until Due |
|
| Time Until Next Due |
|
| Week |
|
| Week of Month |
|
| Week of Year |
|
| When Complete |
|
| When Due |
|
| When Last Complete |
|
| When Next Due |
|
| Work Item |
|
| Work Item (Select) |
|
| Work Items |
|
| Year |
|
Tests
| Test | Description |
|---|---|
| Equal To (=) |
|
| Less Than (<) |
|
| Greater Than (>) |
|
| Less Than Or Equal To (<=) |
|
| Greater Than Or Equal To (>=) |
|
| Starts With |
|
| Ends With |
|
| Contains |
|
| Is Contained In |
|
| Is Element In |
|
| Apply Subfilters |
|
Quick View
Several common types of views based on relationships are available to be created and configured quickly using the Quick View feature. To use the feature:
- Choose which type of entry is to serve as the basis (e.g. all of the work items associated with a particular list value, or all of the time slices associated with particular people)
- Select a view that contains the basis entries in the view list
- Select the one or more entries that will serve as the basis
- Right-click one of the selected entries
- Select Quick View
- Select the type of related entries sought
Quick Entry
List Value, Person, and Work Item views enable the Quick View feature, which allows simple text-based creation of new entries. To use this feature:
- Choose a List Value, Person, or Work Item view in the view list
- Click the Quick Entry button (the icon is a plus sign with a lightning bolt)
- Enter the name for a new entry
- Press the return or enter key
- Repeat steps 3 and 4 as desired
Quick Entry is aware of the filter settings for the selected view, and will automatically set the values of the new entry's characteristics to ensure it will appear within the view. Because of this, Quick Entry might not be able to work if any of the following conditions are true concerning the view:
- A filter is testing the Name characteristic
- A filter is testing a calculated characteristic (as opposed to one that is directly entered by the user)
- A filter is testing a characteristic in a way that does not yield one and only one value for the characteristic of a new entry
- A filter is testing a property value in a way that does not yield one and only one value for the property value of a new work item
- Quick Search is active
- Grindstone Sync is requiring newly created work items to be accompanied by assignments
However, when attempting to use Quick Entry in one of these conditions, an option to alter the condition so that Quick Entry can work will be offered.
Reporting
Exporting Views
The most direct method of extracting data from Grindstone is to export a view. When a view is exported, Grindstone will use the currently displayed columns, sorting, quick search, and filtering.
To export a view to a file:
- Select the view to export in the view list
- Click the Export… button (the icon is a box with a left-facing arrow)
- Choose the location and format of the file to export
- Click the Save button
To copy entries from a view to the clipboard:
- Select the view from which to copy entries in the view list
- Select one or more entries in the view
- Do one of the following:
- Click the Copy button (the icon is two sheets of paper)
- Right-click one of the selected entries and select Copy
- Hold down the control key and press the C key
Graph
Graph can be used to produce charts and tables of data that give an overview of data in a view. To use Graph:
- Select a view (except for a property view) in the view list
- Do one of the following:
- Click the Graph button (the icon is a group of charts)
- Click the View menu and select Graph
Graph can also be accessed directly from the view list by right-clicking on a view and selecting Graph.
The Graph window has the following controls along its top:
- Aggregate
- Drop-down box to select the aspect of the view entries that are being summed to produce data points
- Category Delineation
- Drop-down box to select the aspect of the view entries that are being used to separate the view entries into groups a way in which they are alike, and thereby determine the number of data points to create
- Series Delineation
- Drop-down box to select the aspect of the view entries that are being used to separate the view entries a second time, thereby creating an additional dimension of data points to create (only visible when Multi-Series is available and toggled on)
- Palette
- Drop-down box to select the color palette to use when drawing a chart
- Chart Type
- Drop-down box to select the type of chart to create (or to create a Table)
- Multi-Series
- Toggle button available to all chart types except pie and doughnut, as well as tables
- Stacked
- Toggle button that determines whether data points in the same category are stacked visually on top of each other
- Presets
- Drop-down box to select a previously created preset for the view entry type
- Add/Update Preset
- Button to add a new preset or update a preset (the icon is a plus sign)
- Delete Preset
- Button to delete a preset (the icon is a trash can)
- Generate Graph
- Button to use the current settings to produce the desired chart or table
- Copy
- Button to copy the currently visible chart or table to the clipboard (the icon is two sheets of paper)
- Export
- Button to save the currently visible chart or table to a file (the icon is a box with a left-facing arrow)
Aggregates
| Aggregate | Description per View Entry Type |
|---|---|
| Assignments |
|
| Block Time (Quarter Hours) |
|
| Block Time (Tenth Hours) |
|
| Duration |
|
| Estimate |
|
| Hours |
|
| Hours (Round Down to Quarters) |
|
| Hours (Round Down to Tenths) |
|
| Hours (Round to Quarters) |
|
| Hours (Round to Tenths) |
|
| Hours (Round Up to Quarters) |
|
| Hours (Round Up to Tenths) |
|
| Time Slices |
|
| Work Items |
|
Delineations
In addition to the aspects of view entries listed below, properties are also available.
| Delineation | Description per View Entry Type |
|---|---|
| Complete |
|
| Date |
|
| Day of Month |
|
| Day of Week |
|
| Day of Year |
|
| Due |
|
| Month |
|
| Month of Year |
|
| Overdue |
|
| Person |
|
| Property |
|
| Week |
|
| Week of Month |
|
| Week of Year |
|
| Work Item |
|
| Year |
|
Grindstone Sync
Grindstone Sync is a service that allows teams of Grindstone users to track their time together.
Connecting to Grindstone Sync
To connect to a Grindstone Sync Cloud Subscription, follow these steps:
- Click the Grindstone menu
- Select Change Database…
- Click Create a new database
- Click I'm working with a group of folks that collaborate using Grindstone Sync
- Click Grindstone Sync Cloud
- Enter a Grindstone Sync login
- Enter a personal login
- Enter a personal password
- Choose whether to encrypt the database (and enter the encryption password twice if encrypting)
- Click the Click Here to Confirm All of the Above
To connect to a Grindstone Sync Server, follow these steps:
- Click the Grindstone menu
- Select Change Database…
- Click Create a new database
- Click I'm working with a group of folks that collaborate using Grindstone Sync
- Click Grindstone Sync Server
- Enter a Host
- If instructed to do so, change the default settings for Port and Use SSL
- Enter a personal login
- Enter a personal password
- Choose whether to encrypt the database (and enter the encryption password twice if encrypting)
- Click the Click Here to Confirm All of the Above
Once a database is paired with Grindstone Sync, the personal password will no longer be required. To see a list of the databases paired with Grindstone Sync (and perhaps revoke their access), see Managing Paired Clients. To ensure that a password is required anyway each time that particular database is opened, use the Encryption feature.
Offline Mode
When Grindstone is unable to connect to Grindstone Sync, it will still open and allow normal usage. During this time, it will attempt to reconnect to Grindstone Sync. Once it reconnects successfully, all changes made by the user while offline will be attempted. Any that fail due to conflicts will be reversed.
Security
Setting Own Password
All users can change their own password. To do that, follow these steps with the relevant database open:
- Click the Grindstone menu
- Select Grindstone Sync
- Select Set Your Own Password
- Enter the Old Password
- Enter the New Password
- Type the new password again for Confirm Password
- Click the OK button
Managing Paired Clients
To see the list of databases paired with Grindstone Sync:
- Click the Grindstone menu
- Select Grindstone Sync
- Select Manage Your Paired Clients
To revoke access to a database, follow these steps:
- Select the database for which to revoke access to Grindstone Sync
- Click the delete button (the icon is a trash can)
Supervision
Normal users of Grindstone Sync can only see their own assignments and time slices. Administrative users can see all assignments and time slices. In between these two roles, Grindstone Sync allows for supervisors.
Supervisors can perform administrative actions (see and manage the assignments and time slices of other people), but only for specific people as specified by an administrator. Supervision can also be implicit: supervisors can perform administrative actions for people supervised by those they supervise, with as many levels of supervision as may be desired.
For more information on setting up supervisors, see Person Security.
Administration
All of the features listed in this section are only available to administrators.
Getting Grindstone Sync
Grindstone Sync comes in two varieties to choose from:
| Grindstone Sync Cloud | Grindstone Sync Server | |
|---|---|---|
| Hosting | By Epiforge using the Microsoft Azure Cloud | By customer |
| Pricing | $5 per user per month | $10 per user per month |
| Billing | Monthly, in arrears | Monthly, up front |
| Number of teams | 1 per subscription | 1 per server |
| Grindstone 4 live synchronization | ||
| Graph API | ||
| Encrypted connection | (optional; customer provides SSL certificate) | |
| Quick setup | ||
| On-premises data |
To create a Grindstone Sync Cloud Subscription, click here. To purchase a Grindstone Sync Server, click here.
Security
Change the Grindstone Sync security settings by following these steps:
- Click the Grindstone menu
- Select Grindstone Sync
- Select Security
Managing People
If a People view does not exist, create one by following these steps:
- Click the View menu
- Select New People View
- Click the OK button
To start creating a new person:
- Click the Grindstone menu on the top of the main window
- Select New
- Select Person
Alternatively, to start creating a person from a people view, do any of the following:
- Click the Create New button (the icon is a plus sign)
- Right-click inside the person view and select Create New
- Click inside the person view and press the insert key
To start modifying a person:
- Click a people view in the view list
- Select the person to modify in the selected view
- Do any of the following:
- Click the Modify button (the icon is a pencil) on the top of the list of people
- Right-click the selected person and select Modify
- Double-click a person to modify
- Press the enter key
To edit a person's security settings:
- Click a people view in the view list
- Select the person for whom to edit security settings in the selected view
- Do either of the following:
- Click the Edit Security Settings button (the icon is a person and a lock) on the top of the list of people
- Right-click the selected person and select Edit Security Settings
To delete people:
- Click a people view in the view list
- Select the people to delete in the selected view
- Do any of the following:
- Click the Delete button (the icon is a trash can) on the top of the list of people
- Right-click one of the selected people and select Delete
- Press the delete key
Person Editor
The window that is shown when creating or modifying people is the Person Editor. It has the following fields:
- Name
- The name of the person
Click the OK button or press the enter key to create or modify the person. Click the Cancel button or press the escape key to cancel creating or modifying the person.
Important Newly created people cannot connect to Grindstone Sync until their login and password have been set by editing their security settings.
Integrating New People
Grindstone features a way to quickly integrate people that have been using Grindstone independently into a team that already exists. It can also be used by an administrator to initialize a team using information from a database that was originally used independently. To access this feature:
- Click the Grindstone menu
- Select Grindstone Sync
- Select Integrate New Person
If a new person is being integrated into the team, double-check the name that was retrieved from the database to ensure it is correct, modifying as necessary. If using one's own independent database is being used to initialize the team, check the I am integrating my own data from a previous database box.
Grindstone will attempt to re-use existing team properties and work items rather than create new ones for data from the database. Review the Match Properties and Match Work Items entries. If an existing entry has already been matched, but is incorrect, click Clear. If an existing entry has not been matched, but an appropriate one does exist, click Select and select the appropriate entry.
Once satisfied, click the OK button.
Managing API Keys
Grindstone Sync offers a complete Graph API for third party apps and services to interact with Grindstone Sync data. The documentation for this feature is available here. However, access must be granted to third-party services to access the Grindstone Sync data via API keys.
To manage the API keys:
- Click the Grindstone menu
- Select Grindstone Sync
- Select Manage API Keys
Each API key has an associated name, for the benefit of human beings that need to know which keys are being used by which third-party apps and services. The key itself is randomly generated and cannot be altered.
Databases
Grindstone saves all user project management and time tracking data in database files. To create new a database or open another database:
- Click the Grindstone menu
- Select Change Database
Encryption
Encrypted databases are saved in a manner that prevents anyone without the encryption password to open the database. Even Epiforge Support cannot “get around” this encryption, so be careful with encryption passwords.
To add or remove an encryption password from a database, follow these steps:
- Click the Grindstone menu
- Select Change Database Security
Options
To access the options Grindstone provides:
- Click the Grindstone menu
- Select Options
Appearance
When the Get color and mode from my Windows Personalization Settings box is checked, the behavior is different based on the version of Windows:
| Version | Hue | Saturation | Light/Dark |
|---|---|---|---|
| Windows 7 | Same as Aero Glass | Same as Aero Glass | Light |
| Windows 8.1 | Same as Window Color | Same as Window Color | Light |
| Windows 10, prior to Anniversary Update | Same as User Accent Color | Same as User Accent Color | Light |
| Windows 10, from Anniversary Update onward | Same as User Accent Color | Same as User Accent Color | Same as default app mode Personalization setting |
For Grindstone 2, Grindstone 3, and Task Force Users
Welcome back! A number of things have changed in Grindstone. But don't worry, we'll get you up to speed in no time.
Teamwork
Grindstone 4 does not synchronize with Task Force. Instead, it synchronizes with a new product called Grindstone Sync. If you are accustomed to using Task Force, here are the things you need to know:
- Grindstone Sync does not have its own interface. Whereas Task Force required you to open a web app in your browser to do things like manage users, run team reports, and assign work; all of this is now done entirely within the Grindstone 4 interface.
- Grindstone 4 automatically submits all information to Grindstone Sync in real time. Your team members no longer need to regularly submit their changes. You can even observe them tracking time as they do it.
Names of Data
Some of the common kinds of data in Grindstone have new names.
| Grindstone 2, Grindstone 3, and Task Force | Grindstone 4 |
|---|---|
| Custom Field | Property |
| Task | Work Item |
| Time Segment | Time Slice |
| User | Person |
Exit Tasks and Time Panes; Enter Views
Views have a much larger role in Grindstone 4 than in previous versions. They are now Grindstone's most basic way of displaying information and allowing users to interact with data. With such importance, they now occupy the vast majority of the screen real estate:
There is a type of view for each type of data. For more details, see Views.
The Stopwatch and the Task List Have Joined Forces
You may have noticed in the screenshot above that the Stopwatch is now a part of the main Grindstone window. Please also take note of the Toggle UI Mode button, which causes the Grindstone window to hide everything but the Stopwatch, giving you the familiar Stopwatch interactions to which you're accustomed. Grindstone will also automatically enter Stopwatch mode if it loses focus for 15 seconds, by default.
Migrating Your Old Data
From Grindstone 2 or Grindstone 3
Grindstone 4 can convert databases from Grindstone 2 and Grindstone 3. To convert your Grindstone 2 or Grindstone 3 database:
- Click the Grindstone menu
- Select Change Database
- Click Create a new database (and choose your preferred location to save it, if desired)
- Click It's just me
- Choose whether to encrypt your new Grindstone 4 database with a password
- Click Yes, from Grindstone 2 or Yes, from Grindstone 3
- Click the Browse button in the bottom right and select your old database
- Click Click Here to Confirm All of the Above
From Task Force
Task Force customers upgrading to Grindstone Sync have an easy migration path via a tool created just for this purpose. Once you get Grindstone Sync and connect to it as an administrator, use the migration tool to copy the data from your Task Force subscription or private server:
- Click the Grindstone menu
- Select Grindstone Sync
- Select Migrate from Task Force
List Properties and List Values
Grindstone 4 supports free form properties (formerly called custom fields) just like previous versions of Grindstone. However, we have also introduced list properties, which allow you to specify a list of values that the property can have. So, if you have a property to denote the client or the project, you can now manually manage the list clients or projects, respectively.
If you're using a database which you've converted from Grindstone 2 or Grindstone 3, or migrated a Task Force subscription, then your custom fields became free form properties to match the behavior of the previous version. To change them to list properties, use the Toggle Listing function.
For more detailed information, see Properties.
Reporting Features
All reporting features from previous versions have been replaced by Graph or Exporting Views in Grindstone 4.
Breakdown and Timesheet
We have included some presets for Graph that mimic Breakdown and Timesheet from previous versions of Grindstone. To access the Graph presets:
- Select a time slice view in the view list
- Click the View menu, and then select Graph
- Click the last drop-down box on the top of the window, reading left-to-right
Selecting one of these familiar presets will configure Graph to represent data as the former reports did.
Grid
To produce a report similar to Grid from Grindstone 3:
- Select a time slice view in the view list
- Click the View menu, and then select Graph
- Click the second-to-last drop-down box on the top of the window, reading left-to-right, and select Table
- Click the Multi-Series button that appears to the right side of the drop-down box from the previous step
- Use the first three drop-down boxes to adjust what the table will display
Summary
There is not an exact equivalent to the Summary report in previous versions. However, you can export the contents of any view, which is what Summary was for. To export the contents of a view, click the Export… button (second-to-last, beneath the view's name).
Note Export uses the columns of the view as toggled on and arranged. Re-arrange them by dragging and dropping them into position. Toggle them on or off by clicking the Show or Hide Columns button, found beneath Quick Search.
Note Export obeys the filters and quick search of the view. Use these tools as necessary to refine the scope of your export.
Reference
System Requirements
Supported Operating Systems
- Windows 7 SP1 (x86 and x64)
- Windows 8.1 (x86 and x64)
- Windows 10 (x86 and x64)
- Windows Server 2008 R2 SP1 (x64)
- Windows Server 2012 (x64)
- Windows Server 2012 R2 (x64)
- Windows Server 2016 (x64)
Minimum System Memory
- Required
- 2 GB
- Recommended
- 8 GB
Minimum Available Storage
- Required
- 20 MB
- Recommended
- 50 MB
Automatic Update
The desktop edition of Grindstone (as opposed to the edition available in the Windows Store) periodically checks for new versions made available by Epiforge. When a new version is available, Grindstone will download it automatically and ask to install it. If the notification is ignored or dismissed, Grindstone will perform the update the next time it starts.